Using SftBox/OCX with Visual C++ 6.0
This section describes how SftBox/OCX is typically used with Visual C++ 6.0. For information on how to use this product with unmanaged C/C++ with Visual Studio .NET, please see Using SftBox/OCX with Visual Studio (Unmanaged C/C++).
All interfaces offered by SftBox/OCX, such as ISftBox, ISftBoxItem, etc. are implemented as dual interfaces. Using vtable binding is significantly more efficient than using the IDispatch interface. The approach presented here relies on the #import preprocessor directive available in Visual C++.
Adding SftBox/OCX To A Project
Special Considerations
- Picture Properties
- Font Properties
- Color Properties
Adding SftBox/OCX To A Project
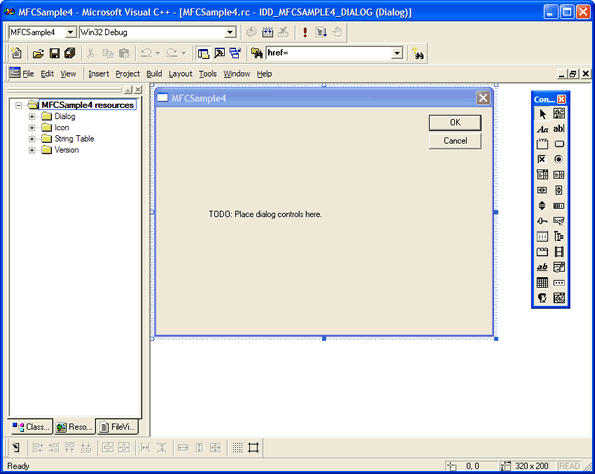
Typically, the control is used with an MFC based application (or ATL). For this example, a sample MFC based application is used, but any unmanaged C or C++ application developed using Visual C++ can use this approach. This sample is created using the MFC AppWizard. A dialog based application is generated. While it is possible to use SftBox/OCX in non-dialog windows, this is rarely the case.
In order to use any ActiveX controls in an MFC based project, OLE control support has to be added to the project. This is accomplished automatically when using AppWizard (as long as ActiveX control support is selected), or can be added later in the CWinApp::InitInstance member function, by using the AfxEnableControlContainer() function. For more information on ActiveX controls and Visual C++ please see the Visual C++ documentation.
Adding The Control
ActiveX controls are easily added to a dialog by right-clicking on the dialog.
From the displayed popup menu, select Insert ActiveX Control..., which will display the following dialog:
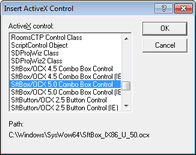
The following SftBox/OCX controls will be shown in the list, one for most development tools, one for and one for other development tools.
- SftBox/OCX 5.0 Combo Box Control - for use with Visual C++ (and other development tools)
- SftBox/OCX 5.0 Combo Box Control (IE) - for use with ,
Select the control "SftBox/OCX 5.0 Combo Box Control" by highlighting it and click OK. This adds the control to the dialog. If an error message is displayed once you click OK, the product SftBox/OCX is not correctly installed or the control may have been unregistered accidentally. Quit Visual C++ and use the entry Maintenance, Register SftBox OCX in Windows Registry in the SftBox/OCX 5.0 program group to register the control. Restart Visual C++ and try to add the control to the dialog again.
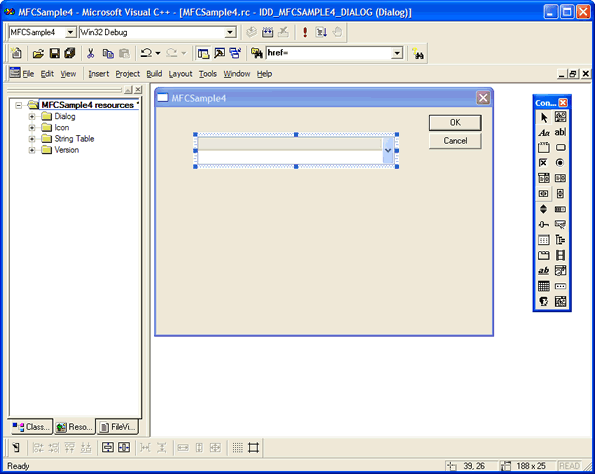
Resize the control to a suitable size.
Adding A Member Variable
Click on the control, then invoke ClassWizard using the menu command View, ClassWizard... The Message Maps tab shows all events supported by SftBox/OCX.
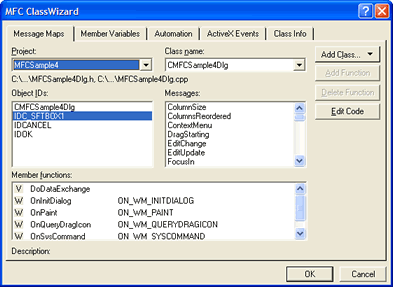
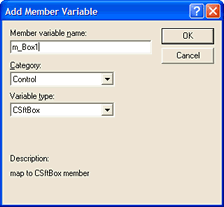
Click on the Member Variables tab and then on the Add Variable... button of the displayed page.
This will add the C++ wrapper classes needed to access SftBox/OCX. You are prompted to confirm this by clicking OK. A number of C++ classes are generated for each object class supported by SftBox/OCX. The only wrapper class that is needed is the class CSftBox/OCX (based on the control's IDispatch interface). It is only needed to define the SftBox/OCX control. Any other C++ classes generated can be discarded and are not used.
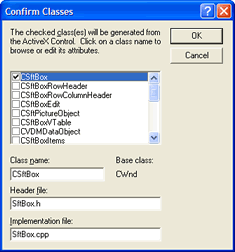
Finally, you will be prompted for the member variable name. Enter m_Combo1.
Using #import
Because the generated wrapper classes are not used, #import statements have to be added to Stdafx.h. The #import directive makes all interfaces and the associated methods and properties available to the application.
#pragma warning(disable : 4192) // automatically excluding 'Ixxx' while importing type library 'stdole2.tlb'
// For information about the following construct, please see Microsoft's
// KnowledgeBase entry Q224610
#import <SftBox_IX86_U_50.OCX> rename_namespace("SftBoxNameSpace") rename("LoadImage", "LoadImageSftBox")
#if _MSC_VER >= 1400 // need at least Visual Studio 2005
# pragma comment(lib, "comsuppw.lib") // avoid link error in VS2005
#endif
#pragma warning(default : 4192)

using namespace SftBoxNameSpace;
SftBox/OCX controls are installed in the Windows System(32) directory.
The #import statement generates two files, SftBox_IX86_U_50.tlh and SftBox_IX86_U_50.tli, which are automatically included into the source at the position of the #import directive. It does so by analyzing the type library which is built into the SftBox/OCX control. These files contain the definition of the methods and properties as shown in the Syntax section of each method and property.
VARIANT_BOOL Boolean = object->Enabled;
In addition, lower level function calls are also defined.
VARIANT_BOOL Boolean = object->GetEnabled();
void object->PutEnabled(VARIANT_BOOL Boolean);
The generated header files SftBox_IX86_U_50.tlh and SftBox_IX86_U_50.tli should be used as a reference when using the functions and C++ properties. This documentation generally includes the higher level property variables and functions only. Some low-level functions are not shown and can only be found in the generated header files.
Which style is used depends on your preference. Both styles are identical in functionality but some styles are easier to use. For example, the Enabled property can be set using any of the following styles:
ISftBoxPtr vCombo1 = m_Combo1.GetControlUnknown();
vCombo1->Enabled = VARIANT_FALSE;
or
ISftBoxPtr vCombo1 = m_Combo1.GetControlUnknown();
vCombo1->PutEnabled(VARIANT_FALSE);
For more information on smart pointers such as ISftBoxPtr used above, please see the Visual C++ product documentation.
Adding IntelliSense Help
IntelliSense information is available for SftBox/OCX 5.0, but it is not automatically added to your projects. To "activate" IntelliSense help, add the generated header files SftBox_IX86_U_50.tlh and SftBox_IX86_U_50.tli to your project. IntelliSense is only available for files that are part of your project. Using the Project, Add to Project, Files... menu command, locate the above header files in your project's directory or subdirectories and add these to your project. These files exist only after the project has been compiled at least once.
All required steps have now been completed to use SftBox/OCX.
Sample Initialization
Add the following sample code to initialize the control in the OnInitDialog member function of the dialog:
ISftBoxPtr vCombo = m_Combo1.GetControlUnknown();
long index;
vCombo->Items->TreeLineStyle = treeLineStyleSftBoxDotted0;
vCombo->ButtonStyle = buttonsSftBoxAll;
index = vCombo->Items->Add("Item 1");
index = vCombo->Items->Add("Item 2");
 vCombo->Item[index]->Level = 1;
 vCombo->Cell[index][0]->Image->Appearance = sftImageCheckboxYes;
index = vCombo->Items->Add("Item 3");
vCombo->Items->Selection = 0;
You can run the sample application and it displays a simple combo box with three items. The second item has a check box displayed as . By implementing the ItemClick event, the check box can be toggled. This is demonstrated in the Pictures sample.
In this example, the control is initialized at run-time using code. Of course it is also possible (and much easier) to set up all properties using the property pages. You can access the property pages by right-clicking on the control and select the Properties... entry of the popup menu.
Please note that you can right-click on a property in a Property Dialog or double-click on the description of a property to access its complete help information.
You may want to change the Style property to choose a suitable basic combo box style. Additional columns can be defined using the Columns.Count property (by displaying the Property Dialog, click on the Columns tab). Also change the Scrollbars property (Attributes tab) to "3 - Both" to display horizontal and vertical scroll bars.
This control has many properties and methods which you can use. This is a very simple example and doesn't even begin to exploit the capabilities of this control. Please take a moment to familiarize yourself with the objects offered by the SftBox/OCX control. Each object represents a specific area of the control and can be fully customized. Also make sure to run the demo which is included with this product and take a look at the included samples.
Special Considerations
The #import statement generates two files, SftBox_IX86_U_50.tlh and SftBox_IX86_U_50.tli, which are automatically included into the source at the position of the #import directive. It does so by analyzing the type library which is built into the SftBox/OCX control. These files contain the definition of the methods and properties as shown in the Syntax section of each method and property.
Picture Properties
Applications written using C/C++ have direct access to Windows APIs and generally can manipulate bitmaps, icons and metafiles using Windows handles. ActiveX controls manipulate all pictures using the OLE Picture object represented by the IPicture and IPictureDisp interfaces. SftBox/OCX has full support for Windows handles and OLE Picture objects, so a C/C++ application can use its preferred picture representation. In addition, SftBox/OCX also support GDI+, so an application can use GDI+ images directly using properties and methods such as SftPictureObject.Image as SftPictureObject.LoadImage.
Using Handles
Most properties and methods have forms which directly accept picture handles as parameters.
The Cell.Image property (for example) can be used as follows:
CBitmap m_Up;
. . .
m_Up.LoadBitmap(IDB_UP);
. . .
vCombo->GetCell(0,0)->Image->PutPictureH((OLE_HANDLE)(HBITMAP) m_Up);
.. or ..
vCombo->Cell[0][0]->Image->PutPictureH((OLE_HANDLE)(HBITMAP) m_Up);
Using OLE Picture Objects
OLE Picture objects can be created using Windows API functions, such as OleCreatePictureIndirect.
IPictureDispPtr pPic;
PICTDESC PictDesc;
PictDesc.cbSizeofstruct = sizeof(PICTDESC);
PictDesc.picType = PICTYPE_BITMAP;
PictDesc.bmp.hbitmap = (HBITMAP) bitmap_handle;
PictDesc.bmp.hpal = NULL;
HRESULT hr = OleCreatePictureIndirect(&PictDesc, __uuidof(pPic)/*IID_IPictureDisp*/, FALSE, (void**)&pPic);
ASSERT(SUCCEEDED(hr));
. . .
vCombo->GetCell(0,0)->Image->PutRefPicture(pPic);
.. or ..
vCombo->Cell[0][0]->Image->PutRefPicture(pPic);
The Syntax section of picture properties typically shows Get, Put and PutRef forms. If both Put and PutRef are available, PutRef is the preferred form as it conserves resources and assigns a picture object reference to the control. Put causes the control to completely copy the picture object.
Font Properties
Fonts are represented using the OLE Font object and the IFontDisp interface. OLE Font objects can be created using the Windows API function OleCreateFontIndirect.
The Cell.Font property (for example) can be used as follows:
IFontPtr pFont = vCombo->GetCell(0,0)->GetFont();
pFont->put_Name(_bstr_t(_T("MS Sans Serif")));
pFont->put_Weight(FW_BOLD);
pFont->put_Italic(VARIANT_FALSE);
CY size;
size.int64 = 100000;// point size * 10000
pFont->put_Size(size);
The Syntax section of font properties typically shows Get, Put and PutRef forms. If both Put and PutRef are available, PutRef is the preferred form as it conserves resources and assigns a font object reference to the control. Any change to the font object is reflected in the control also. Put on the other hand causes the control to completely copy the font object.
Color Properties
The valid range for a color value is 0 to 16,777,215 (0xffffff). The high order byte of a number in this range equals 0; the lower 3 bytes, from least to most significant byte, determine the amount of red, green, and blue, respectively. The red, green, and blue components are each represented by a number between 0 and 255 (0xff). If the high byte is not 0, the system colors as defined in Control Panel's settings are used. The Windows API GetSysColor defines all valid constants. Please see your development environment's documentation for applicable color constants.
vCombo->Items->BackColor = 0x80000000L | COLOR_HIGHLIGHT;
vCombo->Items->BackColor = 0x000000ffL;