Using SftOptions with Delphi
Adding SftOptions To Delphi
Adding The SftOptions Control To A Project
Adding The SftOptsIO Control To A Project
Special Considerations
- Picture and Font Properties
- Object vs. Interface
Adding SftOptions To Delphi
The SftOptions control must be added to the Component Palette before it can be used in a project.
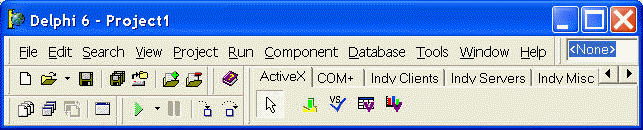
The control is added to the Component Palette using the Component, Import ActiveX Control... menu command, which displays the following dialog:
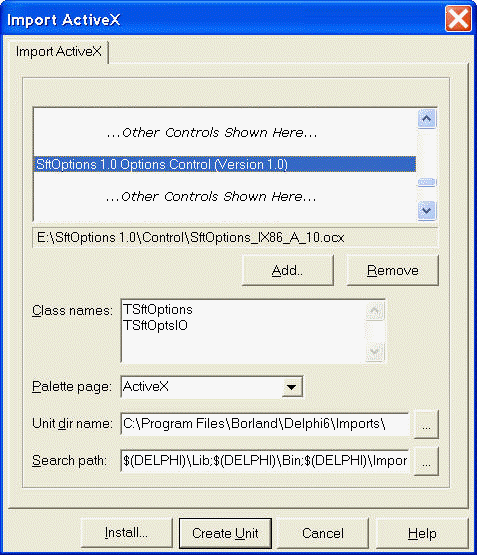
Select the control "SftOptions 1.0 Options Control" by highlighting it and click Install.
In the resulting dialog you are prompted to save the definition into a new or existing package. Enter a suitable new package name and description of your choice and click OK.
Click Yes once you are prompted to build and install the new package.
Now the control has been added to the Component Palette under the ActiveX tab. If an error message is displayed instead, the product SftOptions is not correctly installed or the control may have been unregistered accidentally. Quit Delphi and use the entry Register Design Time Control in the <SPAN STYLE="font-style : italic;font-weight : normal;"> SftOptions 1.0 program group to register the control. Restart Delphi and try to add the control to the Component Palette again.
After the control has been added to the Delphi Component Palette, the Imports directory in the Delphi product location contains the file SftOptionsLib10_TLB.pas. This file has been generated by Delphi and contains all property and method definitions. The generated file should be used as a reference. Please note that the Pascal definitions are generated by Delphi and are not part of SftOptions.
This adds two controls to the Component Palette, the SftOptions user interface control and the SftOptsIO options I/O control.
 SftOptions user interface control
 SftOptsIO options I/O control
Adding The SftOptions Control To A Project
The SftOptions control implements the user interface to allow the end-user to customize all available application options.

Once SftOptions has been added to Delphi, the control can be added to a form by clicking on the SftOptions button of the Component Palette (ActiveX tab).
All required steps have now been completed to use SftOptions.
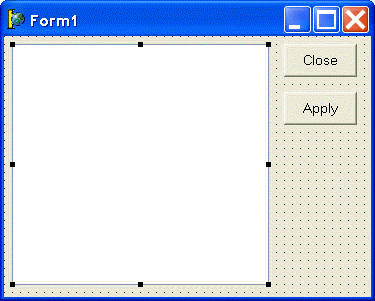
For a complete example, also add two button controls to the form, a Close button (named CloseButton) and an Apply button (named ApplyButton).
Add the following sample code to initialize the control:
procedure TForm1.FormCreate(Sender: TObject);
begin
    ApplyButton.Enabled := False;

    With SftOptions1 do begin
        Add('', 'Main', 'Your first sample', entrySftOptionsTopic, '', '', nil, '', '', '', '');
        Add('Main', 'Rb1', 'Radio Button 1', entrySftOptionsRadioButton, '', '', nil, '', '', '', '');
        Add('Main', 'Rb2', 'Radio Button 2', entrySftOptionsRadioButton, '', '', nil, '', '', '', '');
        Add('Main', 'Rb3', 'Radio Button 3', entrySftOptionsRadioButton, '', '', nil, '', '', '', '');
        Add('', 'Cb1', 'Check Box Option', entrySftOptionsCheckBox, '', '', nil, '', '', '', '');
        IO.Registry := 'USR:Software\Softelvdm\TestData\FirstSample';
        Load;
        InitializationComplete;
     end;
end;

procedure TForm1.SftOptions1ApplyStatusChange(Sender: TObject);
begin
    ApplyButton.Enabled := SftOptions1.ApplyStatus;
end;

procedure TForm1.ApplyButtonClick(Sender: TObject);
begin
    SftOptions1.Save;
end;

procedure TForm1.CloseButtonClick(Sender: TObject);
begin
    SftOptions1.Save;
    Application.Terminate;
end;
In this example, the control is initialized at run-time using code. Of course it is also possible (and much easier) to set up all option entries using the property pages. You can access the property pages by right-clicking on the control and select the Properties... entry of the popup menu.
You can run the sample application and it displays a simple Options dialog with a few entries. After modifying some of the entries, click the Apply Button. Using Regedit you can review the registry settings at HKEY_CURRENT_USER\Software\Softelvdm\TestData\FirstSample. For example, if you select the check box in this example, the registry key "Cb1" is set to the value "1".
Adding The SftOptsIO Control To A Project
The SftOptsIO control offers simplified Registry and INI file I/O to retrieve or set option values without a user interface.
The SftOptsIO control is added to the Component Palette in the same manner as the SftOptions control (see Adding SftOptions To Delphi).
The SftOptsIO control can be added to a form by clicking on the SftOptsIO button of the Component Palette. This control is only visible at design-time. At run-time it is not visible to the end-user. It can only be used by the application.
The SftOptsIO control must be initialized by setting its Registry property (this could of course also be done using the property pages):
SftOptsIO1.Registry := 'USR:Software\Softelvdm\TestData\FirstSample';
Retrieving an option value using the same name as used by the SftOptions control is very easy:
{ var CheckBoxValue: WideString; }
CheckBoxValue := SftOptsIO1.OptionValue['Cb1'];
In this example, the CheckBoxValue variable would contain '1' if the option is selected.
The SftOptions control has many properties and methods which you can use. This is a very simple example and doesn't even begin to exploit the capabilities of this control. Please take a moment to familiarize yourself with the objects offered by the SftOptions control. Each object represents a specific area of the control and can be fully customized. Also make sure to run the demo which is included with this product and take a look at the included samples.
Special Considerations
Picture and Font Properties
While some graphics properties are generated to use a TPicture type, many properties and methods do not (such as SftOptions.Add, SftOptionsEntry.Picture, etc.). These use the OLE picture type IPictureDisp instead, which cannot directly be used with an TPicture type.
Some font properties use the OLE font type IFontDisp instead of the expected type TFont (e.g., SftOptionsHeader.Font, etc.).
However, if these properties are used, the types can easily be converted using Delphi's GetOlePicture and <SPAN ID="DELPHI0">SetOleFont functions. The functions are shown in the "Examples (Delphi)" section of the font and picture properties.
Object vs. Interface
The main control is represented by an object of the TSftOptions class, but can also be represented by its ISftOptions interface. The ISftOptions interface can be retrieved using the Direct property.
Certain methods and properties have different names and return types, based on how they are accessed. While (for example) an object based on the TSftOptions class is mostly equivalent to the ISftOptions interface exposed by the control, Delphi can introduce minor differences. Such differences are shown in the Syntax section of the affected methods and properties. All other objects are identical to their interfaces and no distinction is made.
The Syntax portion shows both forms, the class member and the interface method (the interface method is always marked with a Note indicator). If both forms are identical, only one entry is shown.
Some properties (particularly font and picture properties) may require different types. For example, the Font property accepts a TFont object when accessed through a TSftOptions class object, but uses a IFontDisp interface pointer when accessed directly though the ISftOptions interface pointer. IFontDisp can be provided using the GetOLEFont function.